Setup
Here is detailed description on how to setup other Operating Systems. In the following description we have shown how to install other software, like mysql database server, git-cola, tomcat, phpmyadmin, codeblocks, etc. These are not strictly necessary. But, if you are planning to build java based Servlet which could access database, you need both tomcat and mysql. If can skip installation of these software for now but install them anytime in the future.
Windows
Simply run the j4210u.exe. You must have Java 1.8 or higher installed in your PC. If you do not have Java, you may get it for free from https://www.java.com/en/download/.
Mac OS X
There is an App named UhfApp in the macosx platform folder. You may run the application. But you must have Java 1.8 or higher installed in you Mac. To get Java, visit https://www.oracle.com/java/technologies/downloads/ and follow instructions. Unless you are a developer, it is suggested that you install DMG instead of compressed archive. If you have Intel Mac OS X, use the app in the macosx[intel] folder. If you get the following dialog box:
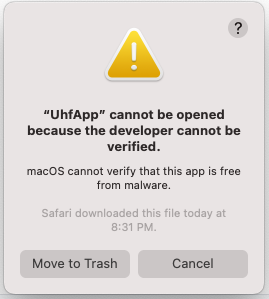
Go to Privacy & Security option from the System Settings and a click on Open Anyway.
Linux
First test if the current baudrate is 57600. Type the following:
stty -F /dev/ttyACM0prefix with sudo, if the command could not be executed by the user. If the baudrate is not 57600, then type:
stty -F /dev/ttyACM0 57600
Retype,
stty -F /dev/ttyACM0Just run the j4210u.sh file in a terminal. If it does not run, make it an executable by typing the following and then press enter:
chmod 744 j4210u.shYou can add the above stty command in the j4210u.sh so you do not need to type the command every time you use your PC. You must have java installed. To install java, follow the same steps described in Raspberry PI section below.
Raspberry PI
Raspberry PI Rasbian image 64-bit may be downloaded from the following link https://www.raspberrypi.com/software/operating-systems . Choose a 64-bit image.
Once the image is downloaded, burn the image in a micro SD card, then boot. For details on how to burn an image into SD card visit elsewhere. Boot the Banana PI from the image. If the image successfully boots, you will see the Raspbian desktop with background image and the top line containing Raspbian icon and following icons: browser, folder, terminal. Click on the Terminal icon to open a terminal window. NOTE: The default username is pi and password is raspberry
Installation
We will install the following for software development. First, you need to install Gparted to resize the partition to atleast 8GB.
sudo apt-get update
sudo apt-get install gpartedDownload default Java Development Kit (JDK). There should be java already installed. Check if java is installed by typing
java –versionThis should show you the version of that is installed, otherwise and error message will be displayed if no java found.
sudo apt install default-jdkInstall Eclipse
sudo apt-get install eclipseIf the above command fails, install Eclipse manually as follows:
wget https://www.eclipse.org/downloads/download.php?file=/technology/epp/downloads/release/2020-12/R/eclipse-java-2020-12-R-linux-gtk-aarch64.tar.gzInstall Mysql Server. Maria DB is open source version of Mysql.
sudo apt-get install mariadb-serverInstall CodeBlocks (For C/C++ development only)
sudo apt-get install codeblocksInstall Tomcat Server (For Java server development only)
sudo apt-get install tomcat9Install PhpMyAdmin (For database development only)
sudo apt-get install phpmyadminChange Mysql root password from blank to something else
sudo mysql -u root -pPassword is blank, simply press enter. In mysql command prompt type the following:
use mysql;
create user 'soacom'@'localhost' identified by 'soacom';
grant all on *.* to soacom@localhost;
{The following line with change the root password. Default password is blank}
alter user ‘root’@’localhost’ identified by ‘soacom’;User: soacom
Password: soacom
{The default phpmyadmin installation does not allow root access.}
If you use Git as source control, install Git Cola, a graphical Git utility.
sudo apt-get install git-colaNow verify Processor Architecture:
getconf LONG_BITGet OS Info:
cat /etc/os-releaseGet System Info:
cat /proc/cpuinfo
uname -m
Banana PI
This is a Raspbian image.
Other Banana PI images can be found from here:
https://download.banana-pi.dev/d/ca025d76afd448aabc63/?p=%2FImages%2FBPI-M4%2Flinux&mode=list
Any image can be used and the setup procedure is the same.
Once the image is downloaded, burn the image in a micro SD card, then boot. For details on how to burn an im age into SD card visit elsewhere. Boot the Banana PI from the image. If the image successfully boots, you will see the Raspbian desktop with background image and the top line containing Raspbian icon and following icons: browser, folder, terminal. Click on the Terminal icon to open a terminal window. NOTE: The default username is pi and password is raspberry.
Installation
We will install the following for software development. First, you need to install Gparted to resize the partition to atleast 8GB.
sudo apt-get update
sudo apt-get install gparted
Run Gparted and resize the partition to 8GB or higher. Then execute all the following commands. Download default Java Development Kit (JDK)
sudo apt install default-jdkInstall Eclipse
sudo apt-get install eclipseInstall Mysql Server
sudo apt-get install mysql-serverInstall CodeBlocks (For C/C++ development only)
sudo apt-get install codeblocksInstall Tomcat Server (For Java server development only)
sudo apt-get install tomcat8Install PhpMyAdmin (For database development only)
sudo apt-get install phpmyadminChange Mysql root password from blank to something else
sudo mysql -u root -pPassword is blank, simply press enter.
In mysql command prompt type the following:
use mysql;
create user 'soacom'@'localhost' identified by 'soacom';
grant all on *.* to soacom@localhost;
{The following line with change the root password. Default password is blank}
alter user ‘root’@’localhost’ identified by ‘soacom’;Note that we created a user soacom and set the password to soacom. Open browser, type : http://localhost/phpmyadmin
Password: soacom
{The default phpmyadmin installation does not allow root access.}
If you use Git as source control, install Git Cola, a graphical Git utility.
sudo apt-get install git-colaNow verify Processor Architecture:
getconf LONG_BITGet OS Info:
cat /etc/os-releaseGet System Info:
cat /proc/cpuinfo
uname -m
Orange PI
For other images, visit:
http://www.orangepi.org/html/serviceAndSupport/index.html
then choose the hardware. The OS download options would be in found in the page. Once the image is downloaded, burn the image in a micro SD card, then boot. For details on how to burn an image into SD card visit elsewhere. Boot the Orange PI from the image. If the image successfully boots, you will see the Ubuntu desktop with Orange Pi logo and the top line containing Ubuntu Application menu. NOTE: The default username is orangepi and password is orangepi
Installation
We will install the following for software development. First, you need to install Gparted to resize the partition to atleast 8GB.
sudo apt-get update
sudo apt-get install gparted
Run Gparted and resize the partition to 8GB or higher. Then execute all the following commands. Download default Java Development Kit (JDK)
sudo apt install default-jdkInstall Eclipse
wget https://www.eclipse.org/downloads/download.php?file=/technology/epp/downloads/release/2020-12/R/eclipse-java-2020-12-R-linux-gtk-aarch64.tar.gzUpzip the .tar.gz file and the eclipse directory will contain the eclipse executable.
Install Mysql Server
sudo apt-get install mysql-serverInstall CodeBlocks (For C/C++ development only)
sudo apt-get install codeblocksInstall Tomcat Server (For Java server development only)
sudo apt-get install tomcat9Tomcat is typically installed in directory /usr/share/tomcat9. The war or ear file location is /var/lib/tomcat9
Install PhpMyAdmin (For database development only)
sudo apt-get install phpmyadminChange Mysql root password from blank to something else
sudo mysql -u root -pPassword is blank, simply press enter. In mysql command prompt type the following:
sudo apt install default-jdk
use mysql;
create user 'soacom'@'localhost' identified by 'soacom';
grant all on *.* to soacom@localhost;
{The following line with change the root password. Default password is blank}
sudo apt install default-jdk
alter user ‘root’@’localhost’ identified by ‘soacom’;Open browser, type : http://localhost/phpmyadmin
User: soacom
Password: soacom
{The default phpmyadmin installation does not allow root access.}
If you use Git as source control, install Git Cola, a graphical Git utility.
sudo apt-get install git-colaNow verify Processor Architecture:
getconf LONG_BITGet OS Info:
cat /etc/os-releaseGet System Info:
cat /proc/cpuinfo
uname -m
BeagleBone
BeagleBone Debian image may be downloaded from the following link
The root user have password root. In some distribution the password is blank (no password).
NOTE: Beaglebone Green does not have HDMI port. To display you need to purchase the SeedStudio BeagleBone HDMI Cape and the firmware to use it, which is available from here:https://debian.beagleboard.org/images/bone-debian-8.7-lxqt-4gb-armhf-2017-03-19-4gb.img.xz
We recommend that you use BeagleBone Black, which has built-in hdmi.
PocketBeagle
PocketBeagle does not have a dedicated Ethernet port, so you need to connect to the Internet through USB networking along with Internet Connection Sharing. The detailed setup guide is described by the following blogs:Windows Host: http://ofitselfso.com/BeagleNotes/HowToConnectPocketBeagleToTheInternetViaUSB.php
Mac Host: https://beagleboard.org/p/hologram/sharing-internet-with-the-pocketbeagle-on-osx-cd62b2
Linux Host: https://www.elementzonline.com/blog/Sharing-Internet-using-Network-Over-USB-in-PocketBeagle
After connection sharing try using
ssh debian@192.168.7.2 (for Windows)
ssh debian@192.168.6.2 (for Mac)
ssh debian@beaglebone.local” (for any)
sudo
One of them should work.
Installation
We will install the following for software development. First, you need to install Gparted to resize the partition to atleast 8GB.
sudo apt-get update
sudo apt-get install gparted
Run Gparted and resize the partition to 8GB or higher. Then execute all the following commands. Download default Java Development Kit (JDK)
sudo apt install default-jdkInstall Eclipse
wget https://www.eclipse.org/downloads/download.php?file=/technology/epp/downloads/release/2020-12/R/eclipse-java-2020-12-R-linux-gtk-aarch64.tar.gzUpzip the .tar.gz file and the eclipse directory will contain the eclipse executable. Install Mysql Server
sudo apt-get install mysql-serverif mysql server is not found, then type:
sudo apt-get install mariadb-serverInstall CodeBlocks (For C/C++ development only)
sudo apt-get install codeblocksInstall Tomcat Server (For Java server development only)
sudo apt-get install tomcat8Install PhpMyAdmin (For database development only)
sudo apt-get install phpmyadminChange Mysql root password from blank to something else
sudo mysql -u root -pPassword is blank, simply press enter. In mysql command prompt type the following:
use mysql;
create user 'soacom'@'localhost' identified by 'soacom';
grant all on *.* to soacom@localhost;
{The following line with change the root password. Default password is blank}
alter user ‘root’@’localhost’ identified by ‘soacom’;Open browser, type : http://localhost/phpmyadmin
User: soacom
Password: soacom
{The default phpmyadmin installation does not allow root access.}
If you use Git as source control, install Git Cola, a graphical Git utility.
sudo apt-get install git-colaNow verify Processor Architecture:
getconf LONG_BITGet OS Info:
cat /etc/os-releaseGet System Info:
cat /proc/cpuinfo
uname -m
Displaying Graphics on PC
You can display the X Windows graphics on your PC. Install Cygwin from https://www.cygwin.com and make sure to choose to install X11 and its components. Finish the installation and then go to your Windows Search menu and type “xwin”. Click on the XWin Server icon. You will see XDG Menu icon.
ssh -XY debian@192.168.7.2
Default password is temppwd. Now all your beaglebone graphical display will appear on your PC.
BeagleBone AI-64
The process to setup the AI-64 is similar to beagle bone. AI-64 can be connected to a monitor and every thing can be done on the monitor. Follow the same steps like Beagle Bone. You do not need to run Gparted to extend the partition as BB AI-64 uses the entire 16GB emmc for linux.
Mac OS X
Mac OS X on the Intel platform is replaced by M2 processor. Apple will gradually remove their support on Intel Macs. There is a version of the demo that should run on Intel Mac, but it will no longer be supported in future. Only Mac (Aarch64) macs will be supported. Later generation Mac does not need drivers for USB serial devices.
Python
Python code is developed and tested on version 3.7. Python code is available from python3 directory. To run the test utility, use: python j42xxtest.py or python3 j42xxtest.py making sure that the platform dependent driver is in the same directory. For Windows, this file(s) is(are) located in platform/win64 directory. You must copy all the DLL files to the python3 directory. For, Mac OS X, this file is libj4210u.dylib. For all other OSes, this file is libj4210u.so. Before running the test utility you must connect the device into the serial port and make sure that the right serial port is used to connect using the python code. If your Linux OS does not have Python, then it can be installed by:
sudo apt-get install python3For GUI, you also need to install the Tkinter package for Python:
sudo apt-get install python3-tkAlternatively, the UhfApp.py could be run in the following way:
python UhfApp.pywhich will launch a Python GUI similar to UhfApp of PC as shown below.
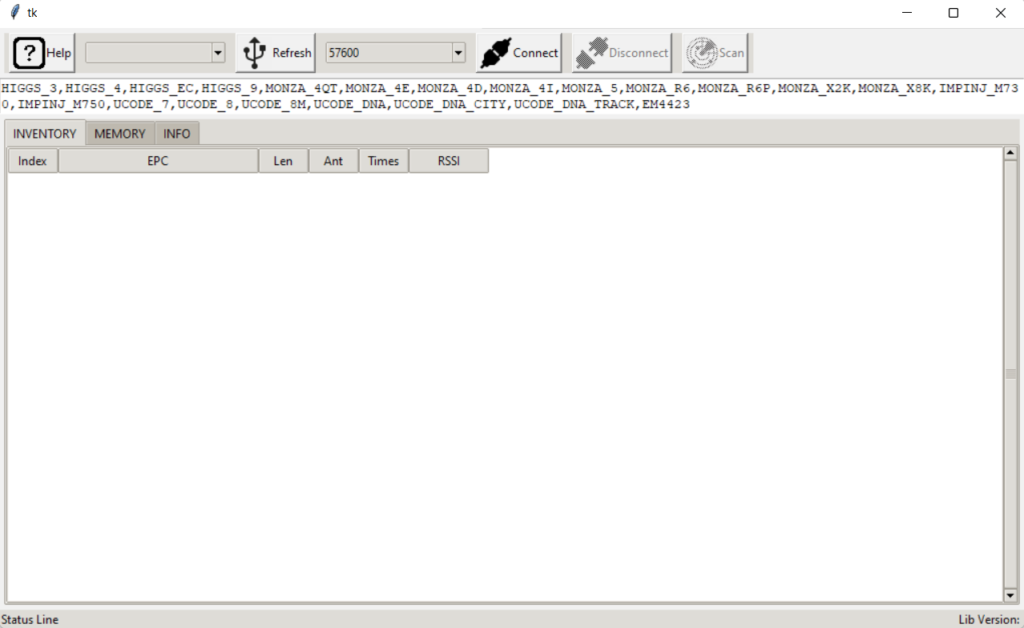
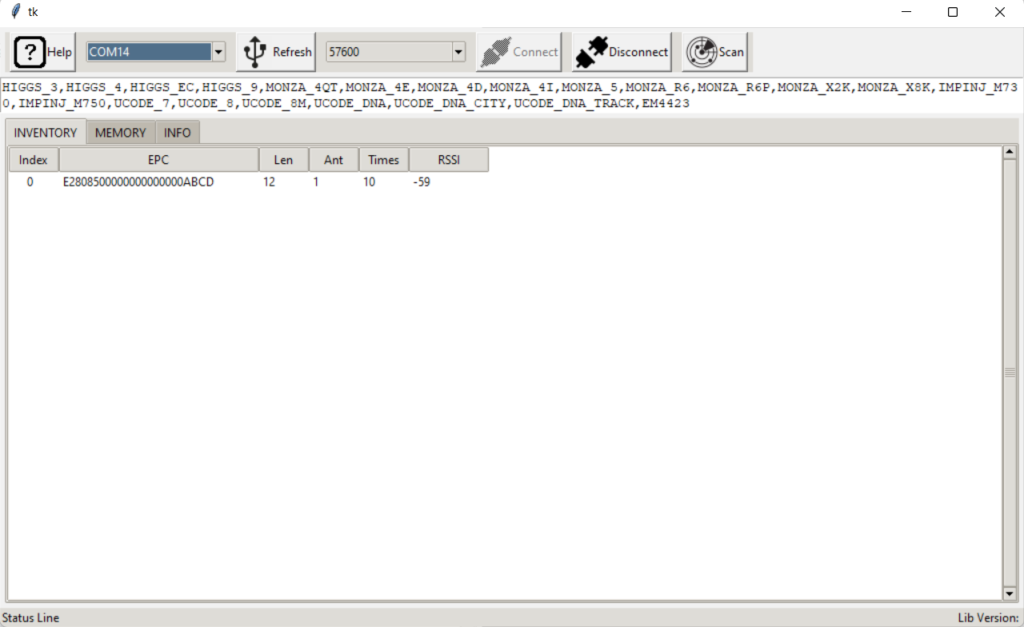
Please click on Refresh button and select the comport of UHF device (here, it is COM14). To connect the device please clean on Connect button. If you place a UHF tag on the device and press scan button, the device will scan the tag and the unique EPC no of the tag will appear. If you fail to connect to a Serial Port, most likely your user does not have access to the port. In that case, exit the App and the the following:
sudo python3 UhfApp.pyTo avoid typing sudo every time, add the current user into the serial port owner group as follows:
sudo usermod -a -G dialout $USERwhere dialout is the user group of root (in Ubuntu). Now you can run UhfApp.py without sudo.
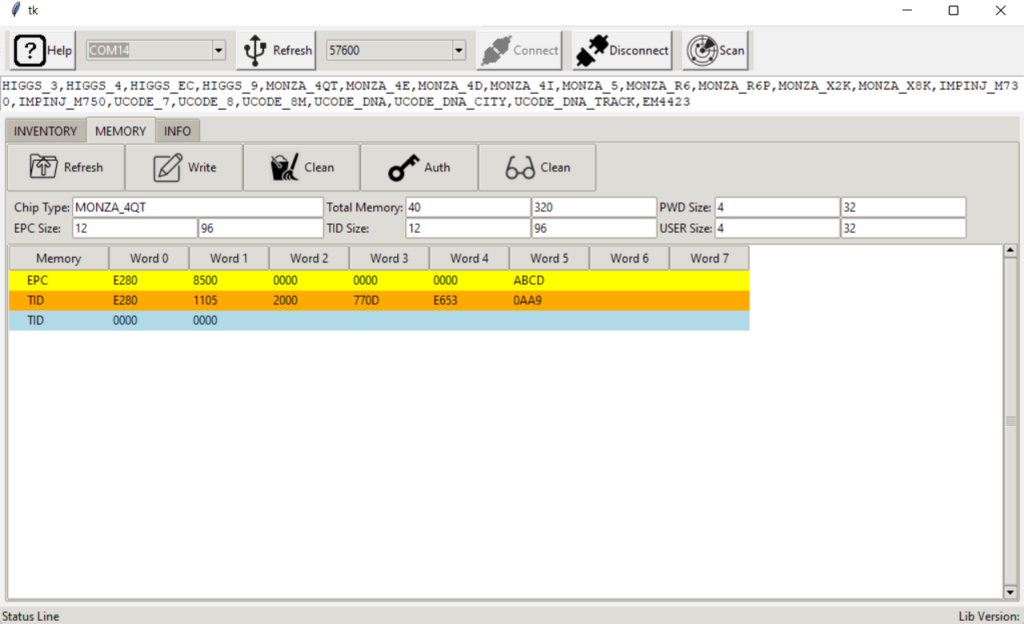
One can see the details of the tag such as Chip Type, Total Memory, PWD Size, EPC Size, TID Size as well as USER size by double clicking on the EPC number.